【iOS】多线程系列二 - NSThread的使用

C语言中的pthreadOC中的NSThread有什么联系?如何使用呢?

一、pthread

在OC中使用C语言的线程,必须导入C语言中的线程库pthread.h

1
2
3
4
5
6
7
8
9
10
11
12
13
14
15
16
17
18
19
20
21
22
23
24
25
26
27
28
29
30
31
32
33
34
35
36
// 1. 导入C语言线程库
#import <pthread.h>

- (void)viewDidLoad {
[super viewDidLoad];
}

- (IBAction)btnClick {
// 2. 创建线程对象
pthread_t thread = nil;
/** 3. 创建线程
* 第一个参数:线程对象(地址传递)
* 第二个参数:线程的属性(优先级设置)
* 第三个参数:指向函数的指针(函数名称)
* 第四个参数:传递给第三个参数的参数(函数参数)
*/
pthread_create(&thread, NULL, run, NULL);
}

// 子线程的任务
void * run(void * params) {
for (NSInteger i = 0; i < 100000; i++) {
NSLog(@"%ld--%d", i, [NSThread isMainThread]);
}
return NULL;
}

/*
输出:
0--0
1--0
2--0
3--0
...
99999--0
*/

通过上述代码执行耗时任务时,不会阻塞主线程。

二、NSThread

2.1. 创建线程

使用NSThread创建子线程有多种方法。

第一种:通过实例方法初始化

1
2
3
4
5
6
7
8
9
10
11
12
13
- (void)touchesBegan:(NSSet<UITouch *> *)touches withEvent:(UIEvent *)event {
[super touchesBegan:touches withEvent:event];
// 1. 创建线程
NSThread *thread = [[NSThread alloc] initWithTarget:self selector:@selector(run:) object:@"hello"];
// 2. 开启线程
[thread start];
}

// 线程任务
- (void)run:(id)userInfo {
NSLog(@"%@", [NSThread currentThread]); // 输出:<NSThread: 0x60000275c940>{number = 8, name = (null)}
NSLog(@"%@", userInfo); // 输出:hello
}

第二种:分离一条新的子线程(类方法,自动开启任务)

1
2
3
4
5
6
7
8
9
10
- (void)touchesBegan:(NSSet<UITouch *> *)touches withEvent:(UIEvent *)event {
[super touchesBegan:touches withEvent:event];

[NSThread detachNewThreadSelector:@selector(run:) toTarget:self withObject:@"hello"];
}

- (void)run:(id)userInfo {
NSLog(@"%@", [NSThread currentThread]); // 输出:<NSThread: 0x6000034b8880>{number = 8, name = (null)}
NSLog(@"%@", userInfo); // 输出:hello
}

第三种:开启后台线程(自动开启任务)

1
2
3
4
5
6
7
8
9
10
- (void)touchesBegan:(NSSet<UITouch *> *)touches withEvent:(UIEvent *)event {
[super touchesBegan:touches withEvent:event];

[self performSelectorInBackground:@selector(run:) withObject:@"hello"];
}

- (void)run:(id)userInfo {
NSLog(@"%@", [NSThread currentThread]); // 输出:<NSThread: 0x60000136e3c0>{number = 8, name = (null)}
NSLog(@"%@", userInfo); // 输出:hello
}

只有第一种创建线程的方法是有线程实例对象的,其他方式都没有返回实例。也就意味着,平时使用实例初始化线程更加易于控制。

2.2. 线程属性和生命周期

  1. 为线程添加name更容易区分线程。
1
thread.name = @"线程01";
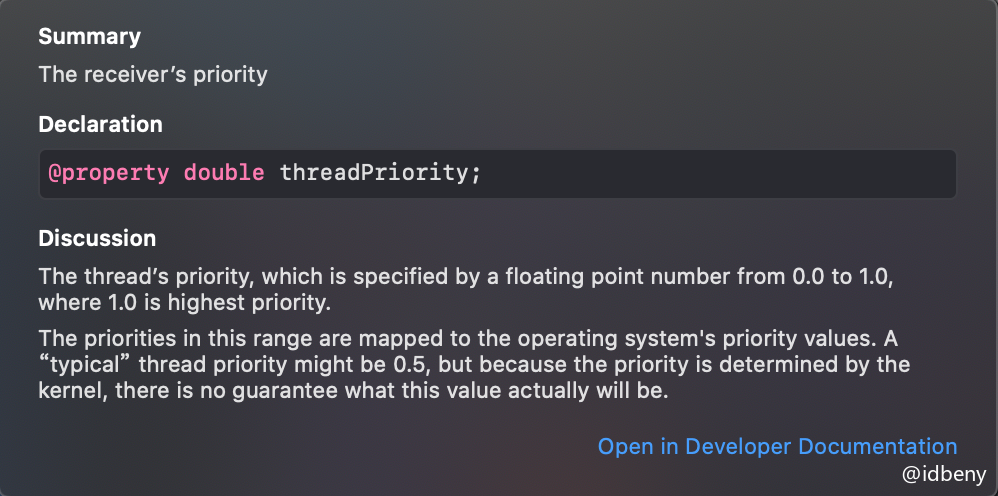
  1. 设置线程优先级,范围是0.0~1.0,默认是0.5,1.0优先级最高。优先级越高线程被CPU调度的概率就越大(注意是概率)。
1
thread.threadPriority = 1.0;

  1. 当线程的内部任务执行完毕之后,线程对象就会被自动释放。

2.3. 线程状态

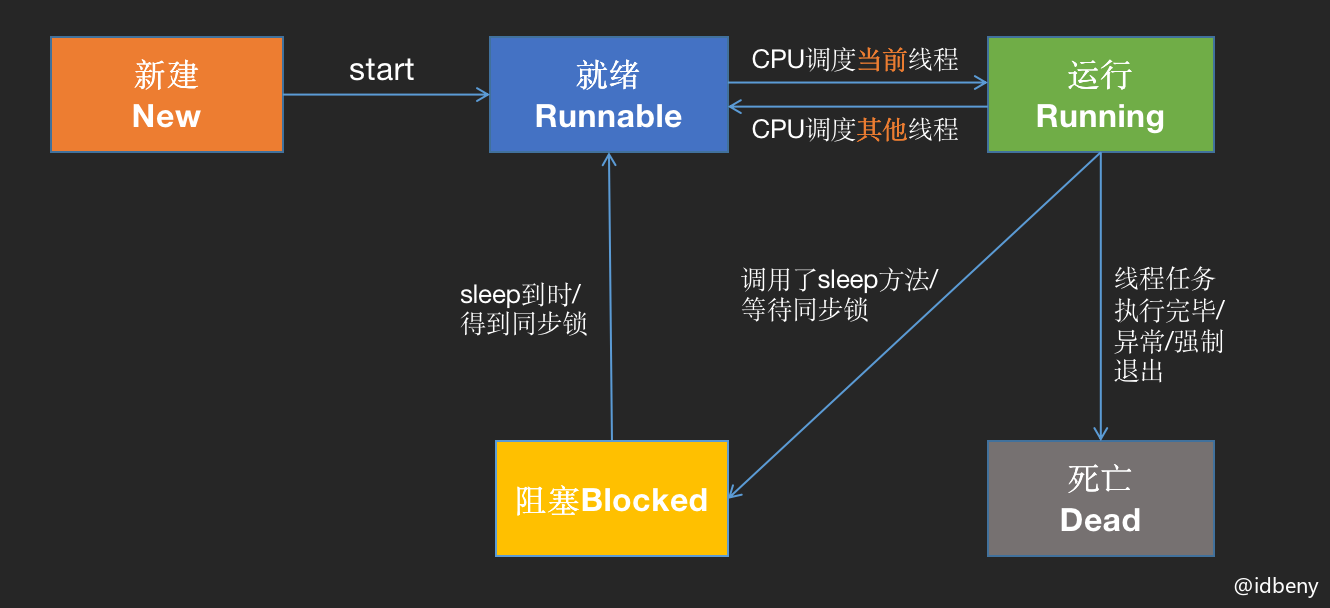
  1. 启动线程:(首先进入就绪状态,然后到运行状态。当线程任务执行完自动进入死亡状态)

    1
    - (void)start;
  2. 阻塞(暂停)线程:(进入阻塞状态)

    1
    2
    + (void)sleepUntilDate:(NSDate *)date;
    + (void)sleepForTimeInterval:(NSTimeInterval)ti;
  3. 强制停止线程

    1
    + (void)exit;

示例代码:

1
2
3
4
5
6
7
8
9
10
11
12
13
14
15
16
17
18
19
20
21
- (void)touchesBegan:(NSSet<UITouch *> *)touches withEvent:(UIEvent *)event {
[super touchesBegan:touches withEvent:event];
// 1. 创建线程
NSThread *thread = [[NSThread alloc] initWithTarget:self selector:@selector(run) object:nil];
// 2. 开启线程
[thread start];
}

// 3.线程任务
- (void)run {
NSLog(@"任务开始");
// 线程阻塞
[NSThread sleepForTimeInterval:5];
NSLog(@"任务结束");
}

/*
输出:
2017-09-15 21:37:58.811589+0800 NSThreadDemo[15792:209327] 任务开始
2017-09-15 21:38:03.821636+0800 NSThreadDemo[15792:209327] 任务结束
*/

通过控制台可以看到任务开始和任务结束之间有5s间隔,间隔就是线程正处在阻塞状态。

三、线程安全

一块资源可能会被多个线程共享,也就是说多个线程可能会访问同一块资源,当多个线程访问同一块资源时(资源可以是对象、变量、文件等),很容易引发数据错乱和数据安全问题。

示例代码(售票):

1
2
3
4
5
6
7
8
9
10
11
12
13
14
15
16
17
18
19
20
21
22
23
24
25
26
27
28
29
30
31
32
- (void)viewDidLoad {
[super viewDidLoad];

// 总票数
self.ticketCount = 50;
// 3个售票员
self.threadA = [[NSThread alloc] initWithTarget:self selector:@selector(saleTicket) object:nil];
self.threadA.name = @"售票员A";

self.threadB = [[NSThread alloc] initWithTarget:self selector:@selector(saleTicket) object:nil];
self.threadB.name = @"售票员B";

self.threadC = [[NSThread alloc] initWithTarget:self selector:@selector(saleTicket) object:nil];
self.threadC.name = @"售票员C";

// 开始售票
[self.threadA start];
[self.threadB start];
[self.threadC start];
}

- (void)saleTicket {
while (1) {
if (self.ticketCount > 0) {
self.ticketCount -= 1;
NSLog(@"%@卖出一张,余票%ld", [NSThread currentThread].name, self.ticketCount);
} else {
NSLog(@"%@发现票已售完", [NSThread currentThread].name);
break;
}
}
}

上面代码看似没有问题,但是当我们把卖票时间拉长(任务执行时间大于线程调度时间)时,就会发现问题。

1
2
3
4
5
6
7
8
9
10
11
12
13
14
15
16
17
18
19
20
21
- (void)saleTicket {
while (1) {
if (self.ticketCount > 0) {
self.ticketCount -= 1;
// 增加任务执行时间
for (NSInteger i = 0; i < 1000000; i++) {}
NSLog(@"%@卖出一张,余票%ld", [NSThread currentThread].name, self.ticketCount);
} else {
NSLog(@"%@发现票已售完", [NSThread currentThread].name);
break;
}
}
}

// 控制台
2017-09-15 21:29:43.313420+0800 NSThreadDemo[17519:236990] 售票员B卖出一张,余票40
2017-09-15 21:29:43.313195+0800 NSThreadDemo[17519:236989] 售票员A卖出一张,余票40
2017-09-15 21:29:43.316993+0800 NSThreadDemo[17519:236991] 售票员C卖出一张,余票38
2017-09-15 21:29:43.317977+0800 NSThreadDemo[17519:236990] 售票员B卖出一张,余票37
2017-09-15 21:29:43.318347+0800 NSThreadDemo[17519:236989] 售票员A卖出一张,余票37
2017-09-15 21:29:43.321834+0800 NSThreadDemo[17519:236991] 售票员C卖出一张,余票35

发现有重复卖票的行为。可以通过**互斥锁(同步锁)**解决线程安全问题。当线程A访问(读)资源时,对资源进行加锁,访问(写)结束后,再把锁打开。如果线程B在线程A访问资源时也想访问这块资源,由于锁的存在,线程B只能等待资源没有加锁时才能访问。

1
2
3
4
5
6
7
/*
* token:锁对象(要求:全局变量,建议直接使用self)
* statements:要加锁的代码段
*/
@synchronized (<#token#>) {
<#statements#>
}

思考:为什么锁对象要使用全局变量?

如果线程每次访问资源时都要加一把新锁,就会导致加的锁是无效的。

1
2
3
4
5
6
7
8
9
10
11
12
13
14
- (void)saleTicket {
while (1) {
@synchronized (self) {
if (self.ticketCount > 0) {
self.ticketCount -= 1;
for (NSInteger i = 0; i < 1000000; i++) {}
NSLog(@"%@卖出一张,余票%ld", [NSThread currentThread].name, self.ticketCount);
} else {
NSLog(@"%@发现票已售完", [NSThread currentThread].name);
break;
}
}
}
}

如果把互斥锁加到while的外层,会怎样呢?结果就是一个售票员把所有的票都卖完了。所以不能在随意位置进行加锁,只有当多个线程会抢夺同一块资源时,对该资源进行加锁,否则随意加锁不仅没有效果,还会损耗程序性能。

互斥锁的本质是使用了线程同步技术(多条线程在同一条线上顺序地执行任务)。

四、原子和非原子属性

OC在定义属性时有nonatomicatomic两种选择。

  • atomic:原子属性,线程安全,为setter方法加锁(默认就是atomic
  • nonatomic:非原子属性,非线程安全,不会为setter方法加锁

既然atomic是线程安全的,为什么开发中会经常使用nonatomic

主要有两点因素:

  1. nonatomic性能好;
  2. 开发中多线程抢夺资源的情况并不多。

五、线程通信

在1个进程中,一般情况下线程不是单独存在的,多个线程之间需要经常进行通信。

线程通信特点:

  • 1个线程传递数据给另1个线程
  • 在1个线程中执行完特定任务后,转到另1个线程继续执行任务

线程通信常用方法:

1
2
3
4
5
6
7
8
/*
* 子线程回到主线程
* aSelector: 回到主线程执行的方法
* arg: aSelector选择器的传递的参数
* wait: 是否等待aSelector执行完毕后再继续往下执行
*/
- (void)performSelectorOnMainThread:(SEL)aSelector withObject:(nullable id)arg waitUntilDone:(BOOL)wait;
- (void)performSelector:(SEL)aSelector onThread:(NSThread *)thr withObject:(nullable id)arg waitUntilDone:(BOOL)wait;

下载图片是一个耗时操作,尤其当图片比较大的时候更加明显。

1
2
3
4
5
6
7
8
9
10
11
- (void)showImage {
NSString *imgURLStr = @"https://image.baidu.com/search/detail?ct=503316480&z=9&tn=baiduimagedetail&ipn=d&word=5k%E9%AB%98%E6%B8%85%E5%A4%A7%E5%9B%BE&step_word=&ie=utf-8&in=&cl=2&lm=-1&st=-1&hd=0&latest=0&copyright=0&cs=3388459890,4007020485&os=1361240164,2722658368&simid=0,0&pn=0&rn=1&di=69520&ln=787&fr=&fmq=1605533629706_R&fm=rs4&ic=0&s=undefined&se=&sme=&tab=0&width=0&height=0&face=undefined&is=0,0&istype=0&ist=&jit=&bdtype=0&spn=0&pi=0&gsm=0&hs=2&oriquery=%E5%A4%A7%E5%9B%BE&objurl=http%3A%2F%2Fimg.jk51.com%2Fimg_jk51%2F196318182.jpeg&rpstart=0&rpnum=0&adpicid=0&force=undefined";
NSURL *imgURL = [NSURL URLWithString:imgURLStr];
CFTimeInterval start = CFAbsoluteTimeGetCurrent();
NSData *imgData = [NSData dataWithContentsOfURL:imgURL];
CFTimeInterval end = CFAbsoluteTimeGetCurrent();
NSLog(@"differ=%f", end - start);
UIImage *img = [UIImage imageWithData:imgData];
self.imgView.image = img;
}
// 输出:differ=0.544529

为避免多图下载时,不影响主线程任务执行(卡屏)。可以将下载操作放到子线程,当下载完成后通知主线程刷新UI。

1
2
3
4
5
6
7
8
9
10
11
12
13
14
15
16
17
18
19
- (void)loadImage {
NSString *imgURLStr = @"https://image.baidu.com/search/detail?ct=503316480&z=9&tn=baiduimagedetail&ipn=d&word=5k%E9%AB%98%E6%B8%85%E5%A4%A7%E5%9B%BE&step_word=&ie=utf-8&in=&cl=2&lm=-1&st=-1&hd=0&latest=0&copyright=0&cs=3388459890,4007020485&os=1361240164,2722658368&simid=0,0&pn=0&rn=1&di=69520&ln=787&fr=&fmq=1605533629706_R&fm=rs4&ic=0&s=undefined&se=&sme=&tab=0&width=0&height=0&face=undefined&is=0,0&istype=0&ist=&jit=&bdtype=0&spn=0&pi=0&gsm=0&hs=2&oriquery=%E5%A4%A7%E5%9B%BE&objurl=http%3A%2F%2Fimg.jk51.com%2Fimg_jk51%2F196318182.jpeg&rpstart=0&rpnum=0&adpicid=0&force=undefined";
NSURL *imgURL = [NSURL URLWithString:imgURLStr];
// 1. 开启分线程下载图片
[NSThread detachNewThreadSelector:@selector(getImgWithURL:) toTarget:self withObject:imgURL];
}

- (void)getImgWithURL:(NSURL *)url {
NSData *imgData = [NSData dataWithContentsOfURL:url];
UIImage *img = [UIImage imageWithData:imgData];
// 2. 回到主线程显示图片
[self performSelectorOnMainThread:@selector(showImage:) withObject:img waitUntilDone:YES];
// 下面的写法可以直接为imageView添加image
// [self.imgView performSelectorOnMainThread:@selector(setImage:) withObject:img waitUntilDone:YES];
}

- (void)showImage:(UIImage *)image {
self.imgView.image = image;
}