【iOS】CoreAnimation的使用及综合案例

CoreAnimation,译为核心动画。它是一组非常抢到的动画处理框架(供Mac OS和iOS平台使用),使用它可以做出非常绚丽的动画效果,而且使用起来非常简单。

CoreAnimation的动画执行是在后台操作的,不会阻塞主线程。动画是直接作用在CALayer上的,不是UIView

一、核心动画的基础

1.1. 继承结构

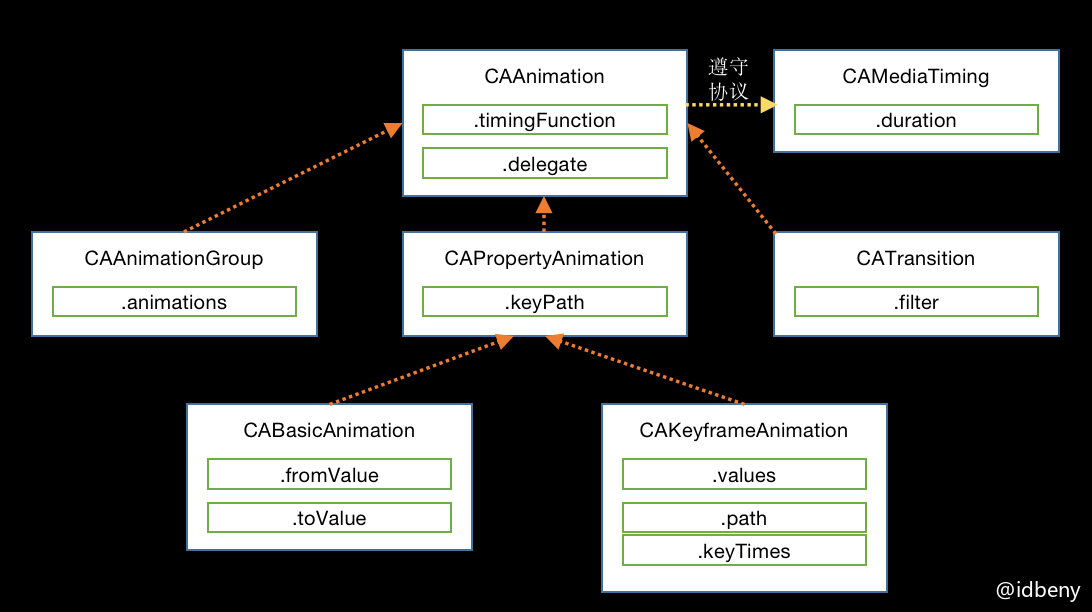
CAAnimation是所有动画的父类,CAAnimation遵守了CAMediaTiming协议。

1.2. 创建动画

CAAnimation是作用在Layer上的,所以说先需要创建CALayer,然后初始化一个CAAnimation对象,并设置一些动画属性,最后通过调用CALayeraddAnimation:forKey:方法,把CAAnimation对象添加到CALayer中,这样就能看到动画了。

addAnimation:forKey:方法中key的作用是用来区分动画的唯一标识,如果只有一个动画,可以设为nil。
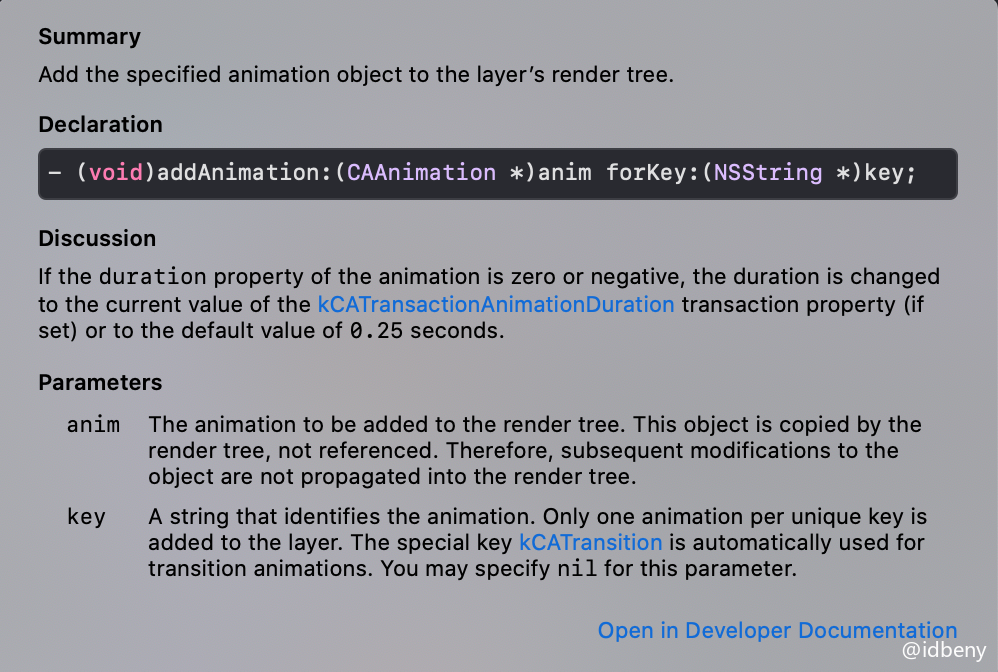
示例:对红色view添加核心动画。

1
2
3
4
5
6
7
8
9
- (void)touchesBegan:(NSSet<UITouch *> *)touches withEvent:(UIEvent *)event {
// 1.创建对象
CABasicAnimation *anim = [CABasicAnimation animation];
// 2.动画属性
anim.keyPath = @"position.y";
// 3.属性目标值
anim.toValue = @(400);
[self.redView.layer addAnimation:anim forKey:@"anim"];
}

手指点击一次,动画执行一次。而且动画直接结束后立马回到原来的位置。下面介绍的两个属性可以调整状态:

  • CAAnimation属性removedOnCompletion可以控制动画完成后是否移除动画,默认是YES。

  • CAMediaTiming协议属性fillMode可以设置动画完成时layer的状态。

    • backwards(kCAFillModeBackwards):原来位置
    • forwards(kCAFillModeForwards):动画目标位置
    • both(kCAFillModeBoth):随机选择backwardsforwards
    • removed(kCAFillModeRemoved):移除动画(默认)

1.3. 心跳效果(CABasicAnimation)

心跳效果主要是比例缩放。

  • repeatCount:重复次数,默认0
  • duration:动画执行时长
  • autoreverses:是否自动反转(从哪来到哪去的往返动画,默认NO)
1
2
3
4
5
6
7
CABasicAnimation *anim = [CABasicAnimation animation];
anim.keyPath = @"transform.scale";
anim.toValue = @(0);
anim.repeatCount = HUGE;
anim.duration = 1.0;
anim.autoreverses = YES;
[self.heartView.layer addAnimation:anim forKey:nil];

1.4. 抖动效果(CAKeyframeAnimation)

抖动效果在苹果手机上经常看到,长按应用图标就会出现左右抖动。抖动的原理就是添加从左边弧度和右边弧度的往返帧动画。

  • values:动画属性值,可以设置多个,多个值会均分duration
1
2
3
4
5
6
7
8
9
10
11
CAKeyframeAnimation *anim = [CAKeyframeAnimation animation];
anim.keyPath = @"transform.rotation";
CGFloat startAngle = -8 * M_PI / 180;
CGFloat endAngle = 8 * M_PI / 180;
anim.values = @[@(startAngle), @(endAngle)];
anim.autoreverses = YES;
anim.repeatCount = HUGE;
anim.duration = 0.1;
[self.appView.layer addAnimation:anim forKey:nil];

// anim.autoreverses = YES 等效 anim.values = @[@(startAngle), @(endAngle), @(startAngle)];

1.5. 路径动画(CAKeyframeAnimation和UIBezierPath)

路径动画只能使用CAKeyframeAnimation来构建,路径使用UIBezierPath创建。

CAKeyframeAnimation有两个属性非常重要:

动画旋转模式

1
@property(nullable, copy) CAAnimationRotationMode rotationMode;

默认值为空,有两个值可供选择:

  • kCAAnimationRotateAuto: 自动旋转
  • kCAAnimationRotateAutoReverse: 自动反转

时间计算模式

1
@property(copy) CAAnimationCalculationMode calculationMode;

默认值linear,系统提供了字符串常量:

  • kCAAnimationLinear: 匀时(每个路径动画时长均分总时长)
  • kCAAnimationDiscrete: 离散动画(只有关键帧有动画)
  • kCAAnimationPaced: 匀速(每个路径动画速度一致)
  • kCAAnimationCubic: 关键帧之间使用圆弧曲线动画
  • kCAAnimationCubicPaced: 在kCAAnimationCubic基础上kCAAnimationPaced动画

当设置计算模式为kCAAnimationPacedkCAAnimationCubicPaced时,keyTimestimingFunctions会失效。

1
2
3
4
5
6
7
8
9
10
11
12
13
14
15
16
17
18
19
20
// 1.创建路径
UIBezierPath *path = [UIBezierPath bezierPath];
[path moveToPoint:self.carView.center];
[path addLineToPoint:CGPointMake(300.0, self.carView.center.y)];
[path addLineToPoint:CGPointMake(300.0, 500.0)];
[path addArcWithCenter:CGPointMake(185.0, 500.0) radius:115.0 startAngle:0 endAngle:M_PI clockwise:YES];
[path closePath];
// 2.创建动画
CAKeyframeAnimation *anim = [CAKeyframeAnimation animation];
anim.keyPath = @"position";
// 设置动画路径
anim.path = path.CGPath;
// 动画旋转模式
anim.rotationMode = kCAAnimationRotateAuto;
// 时间计算模式
anim.calculationMode = kCAAnimationCubicPaced;

anim.duration = 5.0;
anim.repeatCount = HUGE;
[self.carView.layer addAnimation:anim forKey:nil];

1.6. 转场动画(CATransition)

转场效果

控制转场动画的过度效果

1
@property(copy) CATransitionType type;

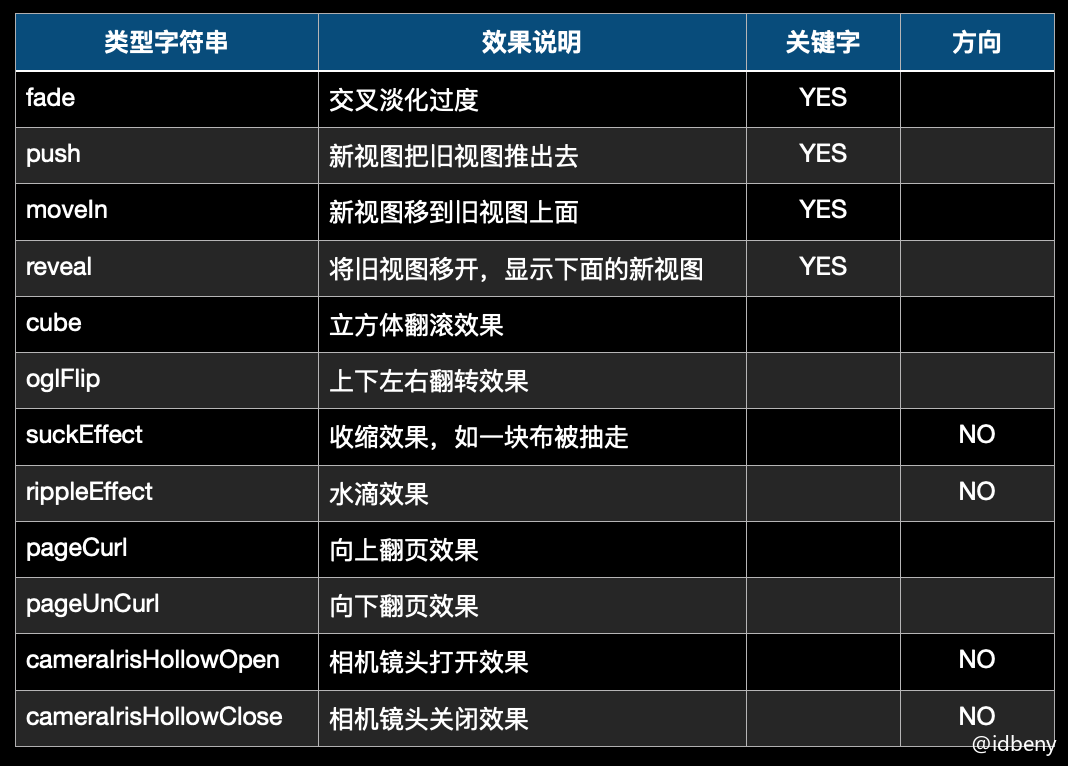
suckEffect收缩效果是从父视图左上角被收走。

转场方向

控制动画从哪个方向开始。

1
@property(nullable, copy) CATransitionSubtype subtype;

有四个常量值:

  • kCATransitionFromRight:
  • kCATransitionFromLeft:
  • kCATransitionFromTop:
  • kCATransitionFromBottom:

动画起止点

1
2
@property float startProgress;
@property float endProgress;

设置动画从哪个点开始,到哪个点结束。数值范围是[0, 1]endProgress必须大于等于startProgress。他们的默认值分别是0和1。

示例

1
2
3
4
5
6
7
8
9
10
11
12
13
14
15
16
17
18
NSInteger _index = 0;
- (void)touchesBegan:(NSSet<UITouch *> *)touches withEvent:(UIEvent *)event {
// 转场代码
_index++;
if (_index > 4) {
_index = 1;
}
self.fireView.image = [UIImage imageNamed:[NSString stringWithFormat:@"fire%ld", _index]];

// 转场动画
CATransition *anim = [CATransition animation];
anim.type = @"cube";
anim.subtype = kCATransitionFromLeft;
anim.startProgress = 0.2;
anim.endProgress = 0.8;
anim.duration = 5.0;
[self.fireView.layer addAnimation:anim forKey:nil];
}

注意:转场代码和转场动画必须在同一个方法中(编译后),否则动画无效。

1.7. 动画组(CAAnimationGroup)

动画组可以把多个动画合并在一起执行。

可以把需要组合在一起的动画放到animations数组中,数组元素需是CAAnimation类型,也就是所有的核心动画都可以放到数组中。

1
@property(nullable, copy) NSArray<CAAnimation *> *animations;

示例:

1
2
3
4
5
6
7
8
9
10
11
12
13
14
15
CABasicAnimation *anim_scale = [CABasicAnimation animation];
anim_scale.keyPath = @"transform.scale";
anim_scale.toValue = @(0.3);
anim_scale.removedOnCompletion = NO;
anim_scale.fillMode = kCAFillModeForwards;
anim_scale.duration = 1.0;
[self.redView.layer addAnimation:anim_scale forKey:nil];

CABasicAnimation *anim_offset = [CABasicAnimation animation];
anim_offset.keyPath = @"position.y";
anim_offset.toValue = @300;
anim_offset.removedOnCompletion = NO;
anim_offset.fillMode = kCAFillModeForwards;
anim_offset.duration = 1.0;
[self.redView.layer addAnimation:anim_offset forKey:nil];

上面示例代码有很多重复属性值,如果把动画添加到动画组就会省下很多代码:

1
2
3
4
5
6
7
8
9
10
11
12
13
14
CABasicAnimation *anim_scale = [CABasicAnimation animation];
anim_scale.keyPath = @"transform.scale";
anim_scale.toValue = @(0.3);

CABasicAnimation *anim_offset = [CABasicAnimation animation];
anim_offset.keyPath = @"position.y";
anim_offset.toValue = @300;

CAAnimationGroup *anim_group = [CAAnimationGroup animation];
anim_group.animations = @[anim_scale, anim_offset];
anim_group.removedOnCompletion = NO;
anim_group.fillMode = kCAFillModeForwards;
anim_group.duration = 1.0;
[self.redView.layer addAnimation:anim_group forKey:nil];

1.8. 代理(CAAnimationDelegate)

所有核心动画都有都可以成为代理。

1
2
3
4
5
// 动画开始时调用
- (void)animationDidStart:(CAAnimation *)anim;

// 动画结束后调用。如果动画在未结束前把所在的layer移除,也会调用。动画在没有被移除前完成时,flag是true
- (void)animationDidStop:(CAAnimation *)anim finished:(BOOL)flag;

二、探究核心动画前后的位置和尺寸

核心动画并没有修改属性的真实值,那为什么看到的内容确实发生了形变呢?我们打印动画执行前后控件的位置看下。

场景:屏幕上红色view添加核心动画,通过形变查看前后位置。

1
2
3
4
5
6
7
8
9
10
11
12
13
14
15
16
17
18
19
20
21
22
- (void)viewDidLoad {
[super viewDidLoad];
// 原始位置和尺寸
NSLog(@"origin:%@", NSStringFromCGRect(self.redView.frame));
}

// 添加核心动画
- (void)touchesBegan:(NSSet<UITouch *> *)touches withEvent:(UIEvent *)event {
CABasicAnimation *anim = [CABasicAnimation animation];
anim.delegate = self;
anim.keyPath = @"position.y";
anim.toValue = @(400);
anim.fillMode = kCAFillModeForwards;
[self.redView.layer addAnimation:anim forKey:nil];
}

// 动画结束
- (void)animationDidStop:(CAAnimation *)anim finished:(BOOL)flag {
// 动画结束后位置和尺寸
NSLog(@"animAfter:%@", NSStringFromCGRect(self.redView.frame));
}
@end

输出:

1
2
origin:{{10, 60}, {100, 100}}
animAfter:{{10, 60}, {100, 100}}

唉,为什么呢?系统出bug了?哈哈哈哈

这是因为layer层其实是一个数据结构,含有模型层和动画层。真实数据都是在模型层,动画修改的是动画层的数据,并没有修改模型层,所以真实位置没有发生改变。

三、UIView动画和CALayer核心动画区别

区别:

  • 核心动画只作用在Layer上;
  • 核心动画看到的一切都是假象,并没有去修改属性的真实值;

选择:

  • 当需要与用户进行交互时,由于CALayer不能和用户交互并且位置是虚假的,所以必须使用UIView动画;
  • 帧动画:当需要根据路径做动画时,使用核心动画;
  • 转场动画:使用核心动画,转场类型比较多。

四、综合案例

4.1. 图片折叠


思路:

  1. 创建上下两个UIImageView,两个控件重叠在一起;
  2. 图片利用代码来控制显示部分内容,上面的图片只显示上半部分,下面的图片显示下半部分(也可以用之前裁剪好的图片);
  3. 因为是按照x轴旋转,所以修改上面UIImageView的锚点为(0.5, 1.0)
  4. 下面的UIImageView也需要修改锚点(0.5, 0.0),否则两个图片之间会有间隙;
  5. 这时候视觉效果已经是一张完整的图片了,而且上面的图片也可以围绕x轴旋转;
  6. 由于整个UIImageView都需要手势控制,所以我们在图片上方覆盖一个透明的view,在这个view上添加手势来控制图片的形变。
  7. 为上面的图片添加透视效果;
  8. 为下面的图片添加阴影渐变。

知识点一:显示部分内容
CALayer有一个contentsRect属性,可以控制内容显示区域,范围是[0 0 1 1],就是从左上角开始,整个layer层的区域大小是按照[0, 1]计算的。设置范围后,会裁剪指定范围外的内容,只保留范围内的内容,并填充整个layer的范围。

1
@property CGRect contentsRect;

例,显示左半部分的范围:{0, 0, 0.5, 1}

知识点二:透视效果
核心动画本质是一个矩阵变换的过程,涉及到矩阵的计算。但是透视效果实现起来非常简单,我们只需要修改图层的初始矩阵第三行四列元素(m34)的值就行了。

1
2
CATransform3D transform = CATransform3DIdentity;
transform.m34 = -1 / 500.0;

在视觉原理上,透视出来的效果是近大远小,距离镜头近的物体就大,越远越小。所以,我们只需要修改分母的值来确定镜头的位置(分母一定要是小数)。

知识点三:弹性动画
弹性动画用到地方很多,微博的选取相册界面就是用的弹性动画。

1
2
3
4
5
6
7
8
9
10
/**
* @param duration 动画时长
* @param delay 延迟时间(延迟多久开始执行动画)
* @param dampingRatio 阻尼比例(值越小弹性越大,一般0.5左右)
* @param velocity 初始化速度
* @param options 动画效果(UIViewAnimationOptions枚举)
* @param animations 要执行的动画块
* @param completion 动画完成回调
*/
+ (void)animateWithDuration:(NSTimeInterval)duration delay:(NSTimeInterval)delay usingSpringWithDamping:(CGFloat)dampingRatio initialSpringVelocity:(CGFloat)velocity options:(UIViewAnimationOptions)options animations:(void (^)(void))animations completion:(void (^ __nullable)(BOOL finished))completion;

代码:
ViewController

1
2
3
4
5
6
7
8
9
10
11
12
13
14
15
16
17
18
19
20
21
22
23
24
25
26
27
28
29
30
31
32
33
34
35
36
37
38
39
40
41
42
43
44
45
46
47
48
49
50
51
52
53
54
55
56
57
58
@interface ViewController ()<CAAnimationDelegate>

@property (weak, nonatomic) IBOutlet UIImageView *topImgView; // 上图片
@property (weak, nonatomic) IBOutlet UIImageView *bottomImgView; // 下图片
@property (weak, nonatomic) IBOutlet UIView *gestureView; // 手势
@property (weak, nonatomic) CAGradientLayer *gradientLayer; // 渐变色

@end

@implementation ViewController

- (void)viewDidLoad {
[super viewDidLoad];
// 1.指定图片显示范围
self.topImgView.layer.contentsRect = CGRectMake(0.0, 0.0, 1.0, 0.5);
self.bottomImgView.layer.contentsRect = CGRectMake(0.0, 0.5, 1.0, 0.5);

// 2.修改锚点(目标:让视觉效果是一张图)
self.topImgView.layer.anchorPoint = CGPointMake(0.5, 1.0);
self.bottomImgView.layer.anchorPoint = CGPointMake(0.5, 0.0);

// 3.添加手势
UIPanGestureRecognizer *panGesture = [[UIPanGestureRecognizer alloc] initWithTarget:self action:@selector(panGestureHandle:)];
[self.gestureView addGestureRecognizer:panGesture];

// 4.添加阴影
CAGradientLayer *gradientLayer = [CAGradientLayer layer];
gradientLayer.colors = @[(id)[UIColor clearColor].CGColor, (id)[UIColor blackColor].CGColor];
gradientLayer.frame = self.bottomImgView.bounds;
gradientLayer.opacity = 0;
[self.bottomImgView.layer addSublayer:gradientLayer];
self.gradientLayer = gradientLayer;
}

// 滑动手势
- (void)panGestureHandle:(UIPanGestureRecognizer *)gesture {
CGPoint translatePoint = [gesture translationInView:gesture.view];
// 计算弧度
CGFloat angle = translatePoint.y / gesture.view.bounds.size.height * M_PI;
// 设置透视
CATransform3D transform = CATransform3DIdentity;
transform.m34 = -1 / 500.0;
self.topImgView.layer.transform = CATransform3DRotate(transform, -angle, 1, 0, 0);

// 设置阴影透明度
CGFloat opacity = translatePoint.y / gesture.view.bounds.size.height;
self.gradientLayer.opacity = opacity;

// 拖拽结束后复位
if (gesture.state == UIGestureRecognizerStateEnded) {
[UIView animateWithDuration:0.25 delay:0 usingSpringWithDamping:0.2 initialSpringVelocity:0 options:UIViewAnimationOptionCurveEaseIn animations:^{
self.topImgView.transform = CGAffineTransformIdentity;
self.gradientLayer.opacity = 0;
} completion:nil];
}
}

@end

4.2. 音乐振动条


思路:

  1. 创建一个背景视图,用来装载振动条,振动条使用CALayer绘制;
  2. 震动的原理是给振动条添加y轴的形变,只要y轴不断的变大和变小就能达到震动的效果;
  3. 把振动条多复制几份并设置一定间距,整体效果就有了。

知识点:
CAReplicatorLayerCALayer的子类,见名知意,他可以用来复制Layer,复制的是添加到自己身上的所有子层。

设置复制的份数,包含已添加到身上的。

1
@property NSInteger instanceCount;

对每一份复制的内容整体做形变操作(不包括首次添加上去的)

1
@property CATransform3D instanceTransform;

设置每一份复制内容动画延迟执行的时间(每一份等待时间是n,不包括首次添加上去的)

1
@property CFTimeInterval instanceDelay;

设置每一份复制内容的RGBA

1
2
3
4
@property float instanceRedOffset;
@property float instanceGreenOffset;
@property float instanceBlueOffset;
@property float instanceAlphaOffset;

代码:

1
2
3
4
5
6
7
8
9
10
11
12
13
14
15
16
17
18
19
20
21
22
23
24
25
26
27
28
29
30
31
32
// 1.创建复制容器
CAReplicatorLayer *repLayer = [CAReplicatorLayer layer];
repLayer.frame = self.shakeBgView.bounds;
[self.shakeBgView.layer addSublayer:repLayer];

// 2.绘制振动条,并添加到赋值容器中
CGFloat layer_w = 20.0;
CGFloat layer_h = 120;
CALayer *layer = [CALayer layer];
layer.backgroundColor = [UIColor redColor].CGColor;
layer.bounds = CGRectMake(0.0, 0.0, layer_w, layer_h);
layer.position = CGPointMake(0.0, repLayer.bounds.size.height);
layer.anchorPoint = CGPointMake(0.0, 1.0);
[repLayer addSublayer:layer];

// 3.振动条添加缩放动画
CABasicAnimation *anim = [CABasicAnimation animation];
anim.keyPath = @"transform.scale.y";
anim.toValue = @0;
anim.duration = 0.5;
anim.repeatCount = HUGE;
anim.autoreverses = YES;
[layer addAnimation:anim forKey:nil];

// 4.设置复制份数
repLayer.instanceCount = 9;

// 5.设置子层的形变(间距)
repLayer.instanceTransform = CATransform3DMakeTranslation(layer_w + 10, 0, 0);

// 6.设置子层动画延迟执行时间()
repLayer.instanceDelay = 0.3;

4.3. 倒影

思路:

  1. 自定义View,重写layer类为CAReplicatorLayer,添加一个UIImageView到view上;
  2. 使用CAReplicatorLayer复制一份子层;
  3. 旋转子层180°(注意锚点位置),并设置复制层的RGBA。

代码:
此案例是重写控制器的view。

1
2
3
4
5
6
7
8
9
10
11
12
13
14
15
16
17
18
19
20
21
22
// 自定义控制器view
@implementation DBControllerView

// 重写CALayer类,返回CAReplicatorLayer类型
+ (Class)layerClass {
return [CAReplicatorLayer class];
}
@end

// 控制器
- (void)viewDidLoad {
[super viewDidLoad];
CAReplicatorLayer *repLayer = (CAReplicatorLayer *)self.view.layer;
repLayer.instanceCount = 2;
// 围绕repLayer锚点旋转
repLayer.instanceTransform = CATransform3DMakeRotation(M_PI, 1, 0, 0);
// 设置子layer的RGBA
repLayer.instanceRedOffset -= 0.1;
repLayer.instanceGreenOffset -= 0.1;
repLayer.instanceBlueOffset -= 0.1;
repLayer.instanceAlphaOffset -= 0.5;
}